|

| |
Fitting rear undertray mod.. Courtesy of Odd
Jobb (I followed this and did mine.. it worked brilliantly. Egg)
Right here goes. I hope I haven't forgot anything, and I
hope you can follow it.
First of all remove the seat and rear hump/seat. Remove grab rail if fitted.
Remove battery. Remove the rear body upper section. This is held in place by 2
allen bolts either side at the front, 2 posi-drive screws on the top near the
front, and the 2 bungee hooks (these have a hex key slot in them). The top
bodywork is also connected to the undertray with plastic buttons (3 on each
side), remove these. You may find some of these buttons break when removing, as
you will need them to re-fit the new undertray it is advisable to get some
spares beforehand. Remove the 2 screws holding the rear seat lock to the
subframe. Unplug the wiring to the rear light. Gently prise apart the upper
bodywork section and lift off and set aside.
Unstrap the ECU (this is held in place with a rubber band). I found that my
alarm had been fitted to the rear undertray so you may have to remove yours if
fitted here. Unplug the wiring to the indicators. There are 4 bolts securing the
rear undertray, 2 at the front beneath the tray and 2 at the rear. Remove these
and the undertray will almost be ready to be removed. You will find that a brake
pipe is routed through the undertray from the reservoir to the cylinder. To save
having to disconnect this pipe I found it easier to cut the undertray either
side of the pipe to allow it to be pushed to one side and allow removal of the
tray. Remove the undertray. Remove the numberplate from the undertray (and
don't forget the petrol tank stay).
This is where the fun starts, as you now have to butcher the old undertray to
re-use the battery box. I also thought it would be better to keep the old ECU
mount as well.
Before you cut anything measure the old tray from the front mounting bolt holes
to the rear light recess. You will need this measurement later.
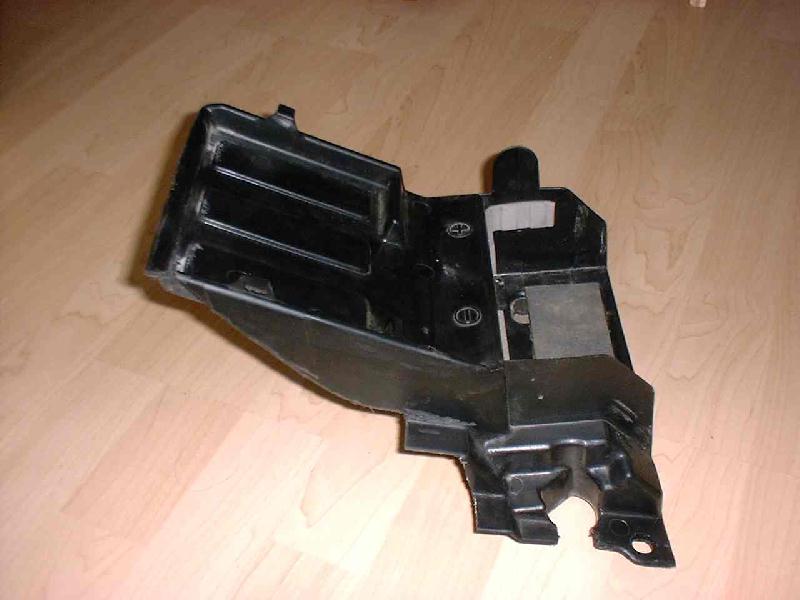
Using a Dremmel or jigsaw, cut out the battery box and ECU housing from the old
tray using the following picture as a guide. (click for larger picture)
Now sit the cut out piece on top and in front (if you see what I mean) of the
new tray. The ECU housing should slid over the new tray whilst the battery box
sits in front. You need to align the two pieces so that the overall length is
the same as the old tray. Remember that measurement made earlier !!!
Using a 6mm bit, drill four holes though the two pieces at suitable locations,
and bolt the two pieces together using the plastic nuts & bolts supplied. Just
be careful that the bolts don't interfere with the mounting of the ECU or
battery. Also drill 2 holes horizontally through the raised lip at the very
rear of the ECU mounting plate BUT NOT THROUGH THE UNDERTRAY. You will need
these later.
Now fit the indicators to the rear of the undertray. If you are re-fitting the
original indicators you will need to cut out an oblong shaped hole on each side.
If you look at the mounting point on the indicators you will see a raised shape
in the centre around the mounting bolt. This shape has to fit into the hole that
you make in the undertray (this stops the indicators from spinning around). Fit
the indicators to the undertray.
If you have purchased alternative indicators then refer to the fitting
instructions supplied with them.
You are now ready to re-fit the undertray.
Slide the undertray assembly under the subframe and into position. If you have a
hugger fitted it is a good idea to place an old towel over it to protect it.
Ease the brake pipe back into the side of the battery box. Fit the two front
mounting bolts and tighten. You will note that the rear of the undertray is
sagging. Remember those two holes you drilled in the ECU mount. Using 2 heavy
duty cable ties, fasten the ECU mount to the subframe, ( going through the
drilled holes and over a subframe brace immediately behind). Now re-fit the ECU,
battery, and indicator wiring. (And any other items fitted to the old tray).
Now re-fit the rear top bodywork, (the undertray sits inside the top bodywork
when you view it from beneath), and tighten all mounting bolts, screws, etc.
Don't forget to plug the rear light back into the harness, and re-fit the
seat/hump lock.
Now look at the rear assembly from beneath and you will see 3 holes on either
side of the top bodywork. Using a 5mm bit carefully drill through these 6 holes
into the undertray. Using the buttons/studs removed earlier, fix the bodywork
to the undertray. Now re-fit the number plate. I found that the number plate
mount would not fit straight onto the undertray, so I cut a piece of plastic
from the old undertray and made a new mount. You may need to experiment a bit
here to see what works best for you.
And that's it. You now have the rear end of your Busa looking how it should
have done when it left the factory.
Good luck
| |
|